
Home
Common Techniques
Classroom Experiments
Virtual Experiments
Tutorials
Games
Glossary
Links
Publishing
Opportunities
About This Site
Contact Us
ZFIN
Cite Us
Microinjection of Zebrafish Embryos
Courtesy of Yevgenya Grinblat, Ph.D., University of Wisconsin, MadisonThe goal of this laboratory is to use microinjection of zebrafish embryos to enhance learning of BMP signaling during early zebrafish development. You will inject into developing embryos the reagent antisense morpholino oligos to “knock-down” (reduce) the amount of an anti-BMP protein, chordin. Based upon your knowledge of zebrafish development and BMP signaling, you will create your own hypothesis on how this antisense morpholino oligos will affect development.
1. Tools
Dissecting Stereoicroscope. You will view your embryos under the microscope to inject them with the reagent.
Microinjector. The machine used when injecting embryos with reagent and control dye.
Petri dishes. These dishes will contain the embryos at the early cleavage stages.
E3 Medium. This solution contains 5mM NaCl, 0.17 mM KCl, 0.33 mM CaCl2, 0.33 mM MgSO4, and 0.1% Methylene Blue. This medium serves as a control medium and will not have any affect on patterning.
Glass microinjection needles. Used for microinjection of embryos in conjunction with the microinjector.
Dissecting forceps. For breaking off the tip of the needle when preparing for microinjection.
P10 micropipettors and disposable tips. Used to pipette solutions into the glass microinjection needles.
Agarose injection dishes. Used under the microscope to observe and accurately inject the embryos.
Blunt Pasteur pipettes. Used for pushing embryos in the Petri dishes.Mock injection solution (red). Injected as a control. This dye will have no effect on BMP signaling and will not affect the results of this laboratory.
Morpholino solution (green). Used as injection to reduce chordin.
2. Hypothesis. Before beginning this experiment, based on your knowledge of zebrafish development and BMP signalling, devise your own hypothesis involving the effects of antisense morpholino oligos on embryonic development. Record your hypothesis in your notebook. Your instructor will assign you to the inject control dye or the experimental morpholino solution. If you are assigned a dish to share with a partner, take turns throughout the protocol so that everyone may learn this skill.
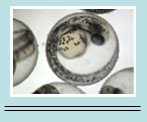
3. Staging and preparing zebrafish embryos.
You will receive a Petri dish filled with E3 and embryos at the cleavage period. Although these embryos have already been staged for this laboratory, they have undergone fertilization at different times and should be restaged in case of further development. Why is it important that the embryos are at the cleavage stage?Using a pipette, move several embryos into your injection dish containing agarose. Be careful not to remove the chorion. Gently push the embryos into the depressions until they are visibly in the depression.
Some embryos will be left to develop without microinjection. Why is it important to leave these embryos? What kind of control is being used here?
4. Micropipetting.
Using a micropipettor, pipet 1 microliter of solution (dye or mopholino) into the wide end of the glass microinjection needle. Why is it important to inject control embryos with dye? What kind of control is being used here? Be sure to remove any excess liquid. Gently insert the wide end of the needle into the holder attached to the microinjector. Use adjustment knobs on the micromanipulator to maneuver the needle tip so that you can see it through the micrscope. While looking through your microscope, use your dissecting forceps to break off some of the glass tip of the needle. Why is it important to perform this step while looking thought the microscope? Push the microinjector pedal once. If a drop appears at the tip, you’ve successfully broken the needle and are now ready to begin injecting. If you see no drop, break off the glass tip off a little bit at a time until you do see the drop. What would happen if you break off the tip not enough or too much?Use adjustment knobs on the micromanipulator to lower the needle tip into the liquid covering the embryos. Move the dish to position an embryo next to the needle. Move an adjustment knob on the manipulator to push the needle through the chorion, and then into the embryo. Aim to get the needle tip into the embryo proper – if this is difficult, just get it into the yolk cell as close to the embryo proper as possible. Why is it important to inject the solution as close to the embryo proper as possible? When the tip of the needle is positioned where you want it to be, push the injector pedal once. Watch the dye move into the embryo. Did you see the solution spread through the embryo or did it stay localized at the injection site? Using the micromanipulator, slowly withdraw the needle from the embryo. Move the plate such that the next embryo to be injected is close to the needle tip. Repeat the above process for all embryos in your dish.
5. Finishing up.
When all the embryos have been injected, move the embryos out of the holding dish and back into a Petri dish with fresh E3 solution. This may be done using forceps and a transfer pipet. Be sure to label each dish as a control group or an experimental group. Move these embryos to a 29°C incubator.6. Next day.
The embryos injected will be ready for fixing the next day. One or more students from each group should come in to fix and observe the embryos. If a camera is available, take a picture so that the rest of the class may observe the changes.Discussion Questions:
How many embryos survived?
At what developmental stage are the embryos? Is there a difference between noninjected, control injected, and experimental injected embryos?
What are the morphological differences between the control and experimental embryos? Describe any defects present.